Archive | 2009

Coconut Rice with Chives: How to Make Fluffy Coconut Rice

how to make coconut rice recipe
The best coconut rice, in my opinion, is made from quality long grain rice (that would be old crop Jasmine rice, if you ask me) and fresh coconut milk extracted from finely-grated mature coconut meat. The rice-liquid ratio is 1:2 or 1:1.5 depending on whether the rice is an old or new crop as the former has lower moisture content than the latter and therefore requires more liquid.

Depending on what you like, several different perfuming or flavoring agents may be added to the rice as it cooks: smashed fresh garlic, bruised fresh pandan leaves, smashed fresh cilantro roots, crispy fried shallots, etc. If you grew up in Southeast Asia, chance are you’ve had at least 4-5 different varieties of coconut rice. Each culture, each sub-culture, each household has its own version.

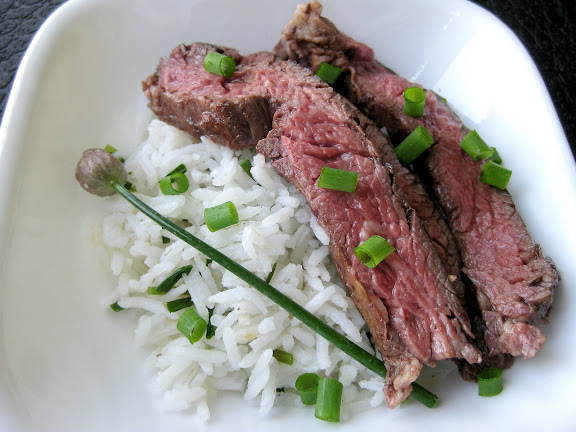
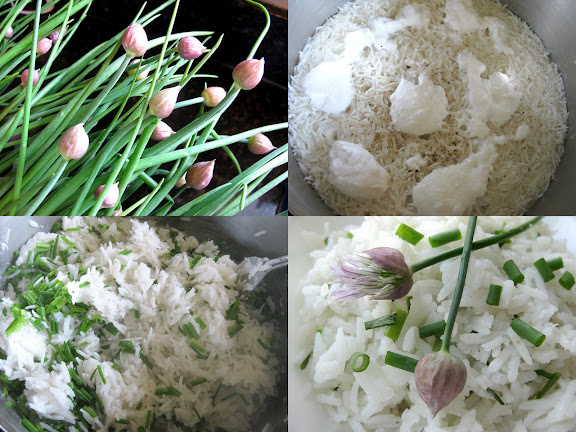
This one of mine has added fresh chives. It’s not the most traditional flavor, but I happen to think chives and coconut go very well together. Also, the method which I use is a little different from what is considered the standard. That is to say, while most recipes instruct you to cook long grain rice with coconut milk in lieu of plain water, mine holds off on the coconut milk until the very end.

I’m not very picky about the type of rice. (Having said that, I have to say Thai Jasmine rice will forever remain the love of my life. I may sometimes get infatuated with Basmati or Mochigome, but my dalliances with anything but Thai Jasmine have invariably proven short-lived; I always come crawling back to my true love.) I am, however, very picky about the texture of cooked rice. I can’t stand wet, gummy rice – a sign of over-hydration and/or too much starch in the liquid in which the rice is cooked. It’s similar to what happens to pasta when it’s cooked too long in too little water, and we all know how tragic that is.

how to make coconut rice recipe

[Coconut rice served with grilled skirt steak marinated in soy sauce, ground coriander, and garlic.]

It could be just me. Perhaps other people have better luck making nice, fluffy coconut rice with canned coconut milk than I do. While I’ve never had problem making good coconut rice with freshly extracted coconut milk, every time I cook coconut rice with canned coconut milk (even my favorite brand which I normally consider godly and blameless), it often comes out wet and gummy. And since freshly-extracted coconut milk from freshly-grated coconut meat isn’t readily available where I live, canned coconut milk is my only option. As for spray-dried coconut milk powder, I think it has very little taste. The other problem is that regardless of whether the rice comes out wet and gummy or partially undercooked (which sometimes happens when I make a misguided attempt to reduce the wetness by using less coconut milk), the rice at the bottom invariably gets over-browned and sticks to the pot or the rice cooker. This makes me cranky.

I have recently learned to do things differently: I do not add coconut milk until the very end. This is the only method which has consistently yielded perfectly-cooked rice, fluffy and thoroughly perfumed with coconut milk with no hard, brown crust at the bottom of the rice pot. The coconut milk is added at the moment when the rice has absorbed all of the water or broth, yet is still not quite fully cooked, which means it is still capable of taking on additional moisture without turning wet and gummy. The use of broth is optional; it’s just an extra step to enhance the flavor. What’s not optional, however, is the rinsing of the rice. Rinsing helps wash off some of the starch which would otherwise get released into the cooking liquid and cause the gumminess. (Imagine what it’s like to cook your rice in starchy liquid similar to cornstarch or Wonder flour slurry.) I rinse my raw rice until the water runs clear.

how to make coconut rice recipeCoconut Rice with Fresh Chives
(Makes 4-5 cups)
Printable Version

2 cups uncooked long grain rice, preferably Thai Jasmine or Basmati
2 3/4 cups water or unsalted chicken or vegetable broth
1 cup good canned coconut milk, not the “light” variety which is too thin
1 teaspoon salt
1/2 teaspoon ground white or black pepper
3/4 cup snipped fresh chives

  • Put the rice in a heavy-bottomed pot or a rice cooker container and rinse it until the water is clear.
  • Add the water or broth into the pot, stir, and bring the rice mixture to a boil, uncovered, over medium-high heat. Turn down the heat to one notch above the lowest setting and cover the pot. In about 15 minutes, the rice should have already absorbed most or all of the liquid. Add the coconut milk, salt, and black pepper; stir very gently once and put the lid back on.
  • Let the rice cook for another 10 minutes or until it appears cooked and all the liquid has been absorbed.
  • Take the pot off the heat and let the rice rest for 10 minutes.
  • Add the fresh chives and give the rice a quick stir; put the lid back on but cover only partially to let some of the steam out.
  • When the rice has cooled down a little, fluff with a fork.
  • This method works well if you cook your rice in a rice cooker as well. You just have to remember to add the coconut milk about 5 minutes before the rice cooker goes ding.
  • Comments are closed

    Thai-Style Omelets (Khai Jiao, Khai Jeow, Khai Jiaw, ไข่เจียว)

    thai omelet khai jiao
    Imagine a bowl of soft and fluffy Jasmine rice. Perfectly cooked. Unadorned. Not piping hot; just a tad warmer than room temperature. Imagine a Thai omelet, a round of soft and fluffy eggy layers, hot and puffy off the wok, with its edges crispy and light as clouds over the rice. Then imagine a blessed anointing of Thai Sriracha on top of it all … My heartbeats are audible as I’m typing this. Continue Reading →

    Comments are closed

    Khanom Khai Nok Krata ขนมไข่นกกระทา – Thai Fried Sweet Potato Balls


    Thai fried sweet potato balls – another one in the GFB-inspired series of fried goods. Please note that the light sprinkling of powdered sugar is my own heathen touch which you would never see done to this old-fashioned snack in the motherland. My fellow Thais, please accept my apology for this sacrilege. For those readers who are related to me, please don’t leave chastising messages on my voicemail.

    This is another incident wherein sweet potatoes are used to replicate something that is originally made with Thai yams. This has resulted in the texture being a bit different and, due to the slightly higher sugar content, the exterior taking on a darker shade of brown more quickly in the frying pan. But I think these are delicious and quite close to what you would find on the streets of Bangkok.

    Khanom Khai Nok Krata (ขนมไข่นกกระทา) is what we call these fried dough balls in Thai. The khanom (ขนม)part is, for lack of a better way to explain, an identity marker alerting your attention to the fact that the ‘thing’ whose name this word precedes belongs in the dessert/snack category. (I’m sure there’s a clearer and better way to explain it, but it eludes me at this moment.) Khai nok krata (ไข่นกกระทา) means quail’s egg – a telling moniker indicating the size of these little cuties. Though it’s difficult to tell from the pictures, each of these fried balls is indeed the size of a quail’s egg.

    However, the similarity between these fried sweet potato balls and actual quail’s eggs extends beyond size; the outer shells of these fried balls, when pressed, collapse and crack in a similar manner to eggshells. When the dough balls hit the oil, they puff up a little. The inside becomes light and airy (almost hollow) whereas the outside forms very thin and crispy shell. The flavor is only mildly sweet. They are not exactly dessert, but more of a snack — something you pop into your mouth while strolling in the park.


    According to one of the Thai cookbooks which I have inherited from my mother, the crispiness of these fried balls is due to the use of limestone water (a common ingredient in Thai kitchens back in the day when betel nut chewing was in vogue). To mimic the alkalinity of this ingredient which would be hard to find these days in Bangkok let alone Chicago, I used baking soda. In my perhaps biased opinion, though the end results aren’t as spectacular as the original, they are most definitely more than acceptable.

    [Note added 5-22-09: As pointed out by Sandy, one of my commenters, please note that these fried sweet potato balls need to be consumed fresh off the wok. Sandy is absolutely right; they don’t keep at all and cannot be reheated. Thanks, Sandy!]


    Khanom Khai Nok Krata ขนมไข่นกกระทา – Thai Fried Sweet Potato Balls
    Makes approximately 120 3/4-inch balls
    Printable Version

    1 1/4 pounds sweet potatoes
    1/3 cup sugar
    1 teaspoon salt
    2 cups tapioca starch
    2 tablespoons all-purpose flour (Any gluten-free flour can also be used.)
    2 teaspoons baking soda
    Room temperature water
    *For better results, omit baking soda and water and use limestone water instead.

  • Bake the sweet potatoes until cooked through. Peel off the skins, mash the potatoes, and leave the mashed potatoes to cool off completely and dry out a little. (You could boil or steam them, but I’ve found that baking is the best cooking method for this recipe. This is somewhat similar to how you prepare potatoes with which you make gnocchi. Dry, flaky riced potatoes require smaller amount of flour to form a smooth dough and result in lighter gnocchi.) You don’t want to skip the cooling and the drying as it would result in gummy, heavy, and sticky end results as opposed to crispy, light, and airy.
  • Once the mashed sweet potatoes have cooled, measure out exactly two cups and put it in a mixing bowl. Add in the flours, baking soda, salt, and sugar; mix lightly with a wooden spoon. Add water to the mixture a little at a time. You need just enough water to form a ball of dough. Mix as lightly as you can; do not knead.
  • Make 3/4-inch balls. You should end up with about 120.
  • Prepare the frying pan and oil. The oil shouldn’t be too hot. (If the dough balls become browned right away once they hit the oil, turn down the heat a couple of notches. You want to allow these balls at least 20-30 seconds in the oil for them to puff up properly and become light and crispy without being overly browned.)
  • Once the dough balls are in the oil, use a wired “spider” to squish them hard against the bottom of the pan and move them around constantly allow the surface to be evenly browned. Continue to do this for 2-3 minutes. After that, the dough balls should be evenly browned and hollow inside and ready to be fished out onto a rack or a paper towel-line plate.
  • Serve immediately. A sprinkling of powdered sugar is considered unorthodox and completely optional. If you have a cranky Thai purist in your immediate vicinity, powdered sugar may not be the brightest idea.
  • Comments { 40 }