Archive | She Veges RSS feed for this section

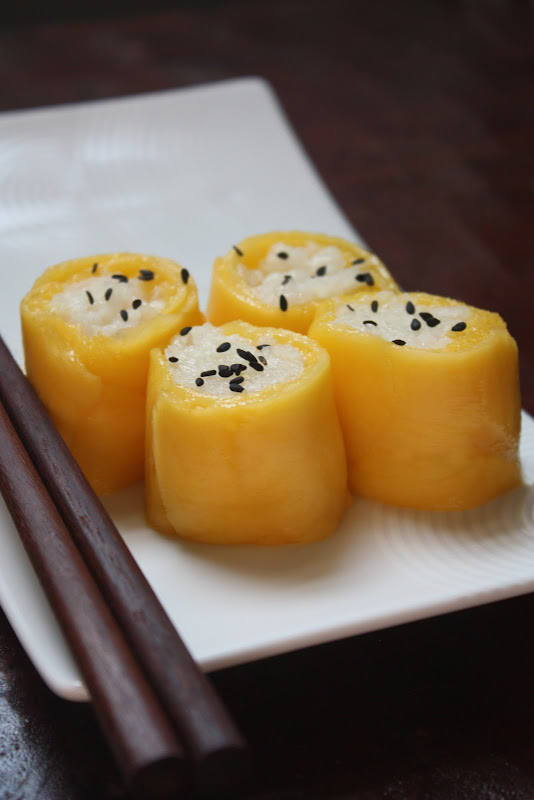
Thai Coconut Sticky Rice with Mango in Sushi Form

thai coconut sticky rice recipe

With the mango season fast approaching and the good Ataulfo (sometimes labeled Manila) mangoes popping up here and there, I thought I would give my old Thai sweet coconut sticky rice and mango recipe a revisit and a makeover.

I won’t lie to you. Turning the famous Thai duo into sushi rolls does absolutely nothing in improving the taste; it only makes it more fun and interesting.

Truth: Thai coconut sticky rice and mango, when done right, is heavenly even if it’s served on a plastic ashtray. Thai coconut sticky rice and mango, when done horribly, will be appalling even if it’s served in a Lladró bowl.

To succeed at sweet coconut sticky rice with mango, you need to start with the right ingredients:

You need to use the right type of mango at the right stage of ripeness following the instructions on how to choose the right mango for Thai coconut sticky rice. This, in my most firmly-held and absolutely unswayable opinion, is the most important thing. A perfectly ripe, sweet-as-honey mango will save even a less-than-perfect batch of coconut sticky rice.

On the contrary, a perfectly-executed batch of coconut sticky rice will put on sackcloth, bury its head in ashes, and curse the day it was born if you pair it with a tart, stringy, tasteless mango. And while it’s possible to adjust the taste of the coconut sticky rice, it’s impossible to do anything to improve the taste and texture of a subpar mango.
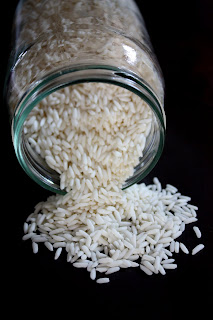


thai sticky rice coconut recipe You also need to use the right type of sticky rice. The term, “sticky rice,” is too vague and used to refer to all kinds of high-starch, short-grain rice. The kind of sticky rice you want to use for this dessert is the long-grain, glutinous rice that is heavily used in Southeast Asian cuisine, especially Thai, Laotian, and Vietnamese.
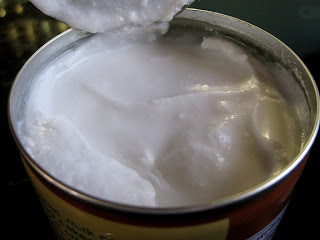


thai mango sticky rice recipeThis is not the most important factor, but it certainly does help when you use quality ingredients. Chaokoh is my favorite brand of canned coconut milk. I like its high fat content which is head and shoulder above the many brands out there that are either anemic or slimy. Low-fat coconut milk is not recommended.


thai coconut sticky rice mango recipeThen when it comes to presentation, knowing how to peel and slice a very, very ripe mango is helpful. Tastewise, you can hold a ball of the coconut sticky rice in one hand, a peeled whole mango in the other, and take bites from each alternately and it won’t make a difference. But if presentation means anything to you, you may want to consider the Thai way of peeling and slicing a ripe mango. If you’ve been to Thailand, you’ll notice that the traditional way of presenting the mango is to “fillet” it and cut the fillet crosswise. No superfluous gadgets required; just a sharp paring knife and some dexterity will do.


thai mango sticky rice recipeThen, of course, once you got all the ingredients and have been armed with the knowledge of how to handle them, making Thai Sweet Coconut Sticky Rice with Mango is very easy.


The sushi idea isn’t originally mine. I once had this dessert served in a similar way (the rice is outside, covering the fruit) at the now-closed Vong’s, by the famed Jean-Georges Vongerichten, in Chicago. It was made with out-of-season mango and some mushy raspberries, and I remember feeling so very disappointed. But at least, I gained an idea on how to serve Thai coconut sticky rice and mango in a fun, whimsical way.

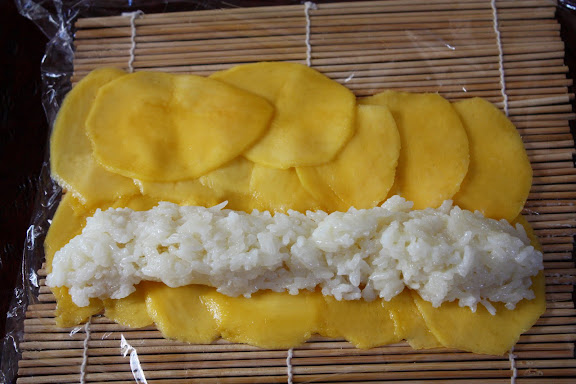
First, you need to peel a ripe mango and slice it thinly lengthwise, with the knife blade on its side parallel to the pit. This is done more easily with a mandoline. If you don’t have a mandoline, make sure your knife is so sharp it can cut a cutting board in half. Without a super sharp knife, you really can’t pull this off.
 

thai mango sticky rice recipe
Then on a sushi mat, lined with a piece of plastic wrap, arrange the mango slices, overlapping, to form a 5×8 rectangle. Scoop prepared sweet coconut sticky rice onto the mango slices as shown.

thai mango sticky rice recipe
Then very gently and carefully roll everything up sushi-style, making sure the rice is entirely encased by the mango slices. Using the sushi mat, lightly squeeze the roll to get rid of air pockets. Gently remove the plastic wrap and cut the roll crosswise into 1-inch pieces.

Sprinkle some black sesame seeds on top (traditionally, fried hulled mung beans are used as the topping), if desired. Whatever you do, don’t pop these rolls into the refrigerator. They need to be made fresh and served right away. You can keep them at room temperature, covered, for an hour or so. But refrigeration will cause the rice to harden, and reheating it along with the fresh mango wrapper in inadvisable.

Comments are closed

Thai Seafood Dipping Sauce – น้ำจิ้มอาหารทะเล

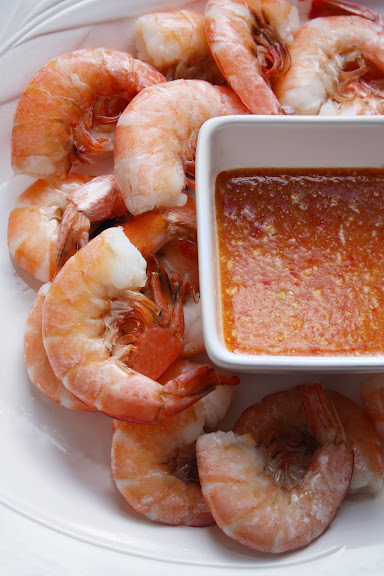
thai seafood dipping sauce recipe
More times than I can count, people have asked me to name some of the biggest culture shocks I experienced when I first came to the US. I can’t think of any. Sure, I once went to a public library hoping to check out some good ‘adult movies’ and came out disappointed. But, for the most part, nothing really threatened my emotional well-being.

Maybe except for one thing: the way seafood is prepared this side of the globe. It was a big culture shock then. It’s still a big culture shock now.

In most cases, seafood is very simply prepared in Thailand. Poaching, grilling, and steaming are the most prevalent methods of preparation when it comes to freshly-caught seafood. Anything else would only detract from its beauty. Blessed with long coastal lines of the eastern seaboard and both sides of “the axe handle,” we always have fresh seafood in abundance.

Some of my fondest childhood memories involve frequent family beach vacations the highlight of which was all of us sitting around a brick barbecue, grilling various marine lives that were swimming just moments ago. I remember the firm flesh, the flavor of the ocean, the natural sweetness.

So it took me a while to get used to seafood dishes that are:

  • Covered in bread crumbs.
  • Enshrouded in thick batter then deep-fried and served with tartar sauce.
  • Chopped up, mixed with bread crumbs or other fillers, shaped into patties, then pan-fried.
  • Boiled up and served with corn on the cob and new potatoes.
  • Served with clarified butter as the dipping sauce.
  • Swimming in mayonnaise.
  • We’re not talking about good vs. bad or better vs. worse here; we’re talking about two different ways.

    I guess I’m set in my way when it comes to seafood. The corn, potatoes, and coleslaw — I can do without. The bread crumbs — I don’t hate, but I don’t “get” either. What I need, though, is this spicy, tangy dipping sauce I grew up with. It’s the first article in my seafood creeds.

    Print this

    How to make Thai spicy seafood dipping sauce my way (notice the number 3): In a blender, liquefy 3 large cloves of garlic (peeled), 3 red or green bird’s eye chilies (you can also use any color jalapeño or serrano; just adjust the amount and heat level accordingly), 3 tablespoons fish sauce, and 3 tablespoons water. Pour the mixture into a small saucepan, add 3 tablespoons sugar, and bring to a gentle boil over medium-low heat; simmer for 30 seconds. (Most people skip this step which is fine. I like to do this to take the edge off the raw garlic.) Remove the pot from heat. Add fresh lime juice to taste. Adjust sweetness and saltiness to taste. I like my sauce equally salty, sweet, and sour. This makes about half a cup.

    This sauce goes best with poached shell-on jumbo shrimp (shown here), steamed fish, steamed mussels and clams, lightly-poached squid, grilled whole fish, and other simple, unadorned, minimally-seasoned fresh seafood.


Comments are closed

How to Prepare Tamarind Pulp (น้ำมะขามเปียก) for Thai Cooking

how to prepare tamarind pulp
One major ingredient in the Thai cuisine is the pulp of dried mature tamarinds. It’s one of the most prominent souring agents right up there with lime juice. Knowing how to prepare tamarind pulp from dried tamarind pods is, therefore, very important if you’re one of those people who take Thai cooking seriously.

If you plan on making your own Pad Thai in the future, familiarity with how to prepare tamarind pulp will serve you well.

Now that I think about it, the reason I have not blogged about Pad Thai [Added 01-01-12: I have recently blogged about Pad Thai], perceived worldwide to be the quintessential Thai dish, is mainly because I want to introduce to you first each of what I consider to be the essential ingredients. Tamarind pulp, the ideal souring agent of the dish, is first on the list.

how to prepare tamarind pulp
Too often, tamarind pulp is referred to as tamarind juice. The only explanation for this obvious misnomer that I can think of is that the Thais call prepared tamarind pulp, “น้ำมะขาม(เปียก),” which is literally “tamarind water.” Needless to say, น้ำมะขามเปียก is not at all the juice of the unjuiceable tamarinds; it is the hydrated and disintegrated pulp of this fruit-like legume.

This is similar to “prune juice” which is also a misnomer as you don’t “juice” the prunes to get prune juice; you take the pulverized pulp of dried plums and add enough water to it to make it drinkable. It is also the case with tamarind “juice.” If you go to Thailand and some countries in Latin America, you may see tamarind juice offered as a beverage. That beverage is nothing but water flavored with tamarind pulp. And the tamarind pulp which we’re talking about here is simply a much, much more concentrated version of what is referred to as tamarind juice.

Did I thoroughly confuse you yet?

I believe the juice vs. pulp issue is worth mentioning because most prepared tamarind pulp that you’ll see in Asian markets is labeled, “tamarind juice” or “tamarind juice concentrate.” When you see something like that, just know that it is, in fact, tamarind pulp.

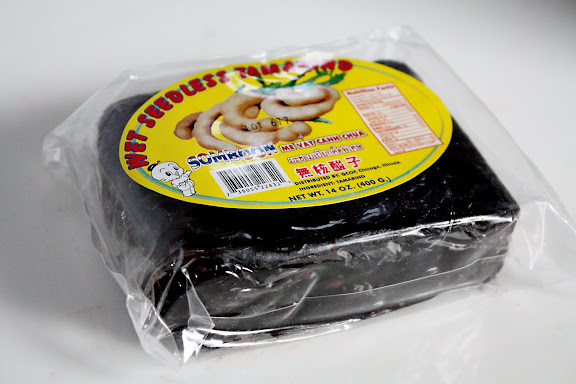
Why make your own? Well, one reason is that it’s more economical that way. When you buy the watery prepared tamarind pulp that comes in a plastic tub, you get mostly water and frustratingly small amounts of tamarind for your money. When you buy a block of shelled tamarinds as shown here, you get 100% tamarinds and no filler.

how to prepare tamarind pulp
This leads to the other reason why you should prepare your own tamarind pulp. As mentioned above, most brands of prepared tamarind pulp that I have seen on the market are too thin and watery. This means in order to get the desired level of sourness, you need to put in more of it.

The souring agent is the tamarind pulp proper; the water is merely the vehicle that is there only to help soften and loosen the pulp.

Therefore, to get maximum sourness without adding too much liquid to the dish, you need prepared tamarind pulp that contains as little water as possible. You’re not going to get that from commercial prepared “tamarind juice concentrate.”

Does the level of concentration make a difference? In some dishes, this is not a battle worth dying in. In other dishes, however, too much liquid produces less-than-desirable results. Take Pad Thai for example. Adding too much liquid could very well result in the noodles being tragically soggy and falling apart. You definitely don’t want that.

In the US, dried tamarinds are often sold whole at Hispanic markets or in blocks (with the shells, or sometimes both the shells and seeds, removed) at Asian markets. I like the block kind as it eliminates one messy step.

The ratio of tamarind pulp and water that works best for me is one ounce of shelled tamarinds per one fluid ounce of water. This results in prepared tamarind pulp that is thick in consistency and concentrated in flavor. The amount of water is just enough to allow the shelled tamarinds to soften up and disintegrate without much manual labor on your part. Other than that, the water serves no purpose whatsoever.

For a 14-ounce block of tamarinds shown here, I use 14 fluid ounces of lukewarm water (1 3/4 cups). [Block tamarinds are the easiest to work with. Having been shelled, deseeded, and kept in a condition wherein they stay moist, block tamarinds don’t need to be boiled or soaked in boiling water.] I let it soak for 15-20 minutes. Then I grab a handful of the tamarind pods and keep squashing and squeezing the now-softened pulp to separate it from the veins, the seeds, and the tough membranes that cover the seeds. Use both hands for extra pleasure.

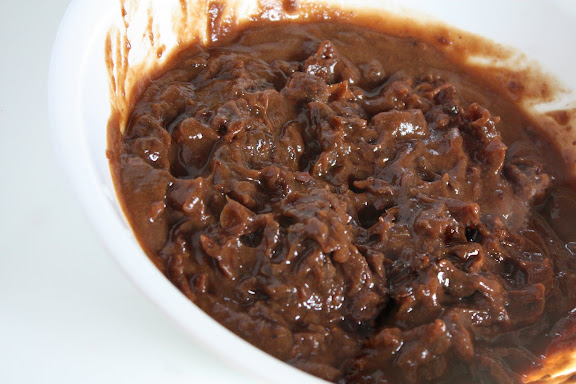
What you end up with after the squashing and squeezing is a thick purée of tamarind pulp along with the veins, seeds, and membranes. Some people run the tamarind pulp purée through a sieve to separate out the pulp. When you deal with large amounts of tamarind purée, this makes more sense. However, I prefer to grab a handful of the tamarind purée and squeeze it really hard. The tamarind pulp purée will seep through your fingers as you tighten your fist while the veins, seeds, and membranes stay inside. Then you keep the purée and throw away the junk in your fist.* You keep doing this until you end up with nothing but thick and smooth tamarind pulp in the bowl.


It may sound like a messy, icky undertaking, but in less than half a minute into it, if that long, you will have this very strangely pleasant why-didn’t-I-do-this-before feeling. Trust me. I’ve done this for years and every time still feels like the first time.

This ratio of 14 ounces tamarinds and 14 fluid ounces of water will yield approximately 16 fluid ounces (2 cups) of very concentrated tamarind pulp, ready to use in any recipe. All recipes calling for prepared tamarind pulp, which you will find here henceforth, assume that the pulp is prepared in this manner and has this consistency.

If you plan to use a lot of prepared tamarind pulp in a week or two, you can store it in a glass jar in the refrigerator. For longer storage, I recommend that you freeze it as prepared tamarind pulp can get moldy after a couple of weeks in the refrigerator. If you have ice trays, fill them with the tamarind pulp, freeze, pop out the frozen cubes and store them in a freezer bag in the freezer. That way you can thaw out just a few cubes when you only need a small amount.

_____________________

Angry Asian Creations makes a Khmer spicy beef and aubergine soup, “Samlaw Machou Kroeung,” with prepared tamarind pulp.

The Well-Seasoned Cook makes Indian Spiced Tamarind Cooler with tamarind pulp

*My maternal grandmother never threw away the leftover tamarind veins and membranes. She used them as a facial scrub. She also sometimes used the pulp as a facial mask. It must have worked as my grandma was one really hot woman and remained so well into her 70s (needless to say I didn’t inherit those genes …). I once witnessed how her doctor, who was in his mid-40s back then, hit on my grandma who was probably 75 at that time. It was quite entertaining.

Comments are closed