
Here are the five most frequent responses I get when I tell people (in the US) I’m from Thailand:
- Oh, I (my parents, co-workers, parishioners, parole officer, etc.) love Pad Thai! (Okay … is this when I politely return the favor and tell them I love hot dogs and hamburgers?)
- I would love to visit Taiwan; I’ve heard it’s beautiful. (So have I.)
- But you don’t have the accent! (Did you expect me to say something like, pine-ap-pun fly lice?)
- You look like you’re from somewhere else. (Um, Nanoo Nanoo?)
- I had a Thai classmate in college, his/her name is X. Do you know him/her? (Of course, I do. All 60 million of us are on a first-name basis.)
- I used to find these responses annoying. But I’ve matured over the years and come to see them as amusing and even cute. I’ve also learned to smile graciously, knowing that 1. people mean well, and 2. it could have been worse. Having said that, though, I still haven’t gotten used to the first response. Does this happen to people from other countries as well? Japanese, do people say, “I love sushi!” to you the moment they find out where you’re from? Mexicans, do you get “I love tacos!” all the time? Filipinos, do people tell you they adore chicken adobo upon learning your country of origin? Swedes, when you introduce yourselves, do folks tell you they like your meatballs? You see, we all tend to judge things, whether or not we should, using what we would or wouldn’t do as the standard. Since I personally would not consider saying,”I love waffles!” to a Belgian whom I’ve just met, I find this whole blurting-out-a-dish thing a bit puzzling.
The “I love Pad Thai” thing has happened to me so often I made t-shirts out of it.
Anyway, how’s that for a completely unrelated intro to Tom Yam (ต้มยำ) – often transliterated Tom Yum)? Tom Yam came to mind because it represents another variation to response #1 above (it’s either Pad Thai or Tom Yam). And since I currently have no intention of blogging about Pad Thai, a dish that is virtually impossible to make excellently (unless you’re a fourth generation street food hawker in Thailand), I thought I would tackle this much less complicated dish.
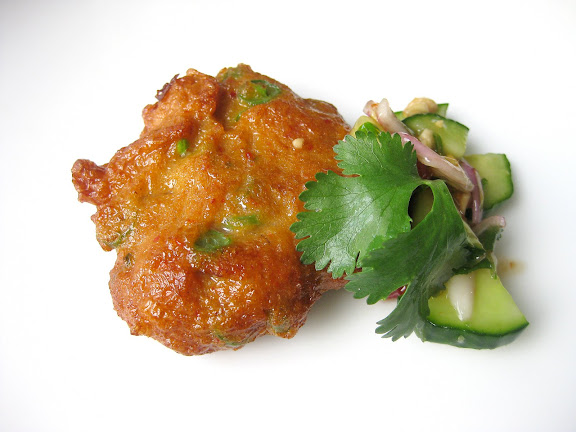
Tom Yam 101 Part One is on the old-fashioned method of making Tom Yam. It produces the kind of Tom Yam that you’re not likely to find in Thai restaurants due to its ugliness. I am of the opinion that most unbelievably good foods are often aesthetically-challenged. Old-fashioned Tom Yam definitely falls into that category. It’s delicious beyond description, but its appearance will make you gasp in horror and cover your children’s eyes. This is because it is made out of either bone-in or tough cuts of meat appropriate for simmered or braised dishes.
Through this process, the sweetness of the broth is coaxed out of the bones and tendons and the meat becomes meltingly tender. It sounds good when you read the description, but if a simmered/braised dish like this entered a beauty pageant, it probably wouldn’t make it past the swimsuit round. Look at the picture at the top of the post — definitely not the kind of beauty queen Tom Yam you get at most restaurants wherein immaculately white chicken breast or adorable pink shrimp graces the bowl.
But this is the kind of Tom Yam your grandmother makes. Rustic. Unpretentious. Old-fashioned. Rustic. Sacred — sort of.
[Added June 10, 2013: Here’s Part Two – Tom Yam Kung.]
Tom Yam 101 Part One – The Old-Fashioned Tom Yam (ต้มยำ)
Printable VersionYou’ll need:
Meat: Use bone-in or tough cuts of meat in order to flavor the broth. Boneless or tender cuts do not have that power. Whole chicken, cut into chunks, works well. So do beef shank, pork hocks, beef shoulder, or even firm fresh-water fish cut crosswise into large bone-in steaks. For this batch, I used 2 lbs of cut up oxtail, because I adore it. The meat is so tough you need to simmer it for a long time to tenderize it. But oxtail gives back. Oh, it does. The effort and energy you put into the simmering is more than compensated for by the sweet broth it produces. (Oxtail Tom Yam is not a first date dish, though. I have to warn you about that. Have you eaten a piece of oxtail? You can’t eat it with a fork and a knife, you know?
Water: It doesn’t matter how big a batch you’re making or how much meat you use. Just put the meat in a pot big enough to hold it and enough water to cover about 2-3 inches above the meat. You don’t need to use broth; the meat and the bones will turn water into broth in the process.
Aromatics: You need the indispensable trio of Tom Yam aromatics – thin slices of fresh galangal (no galangal powder!), fresh or frozen kaffir limes leaves (bruised), and fresh (no dried or powder) lemongrass (cut up and lightly bruised). As a rule of thumb, I think a combination of one kaffir lime leaf, 2-3 slices of fresh galangal, and one 1-inch piece of lemongrass is enough to flavor every two cups of water you use. So regardless of how big or small your Tom Yam batch is, as long as you stick with this water/aromatics ratio, you should be fine.
Add the aromatics to the pot after the oxtails have already become tender and leave them in there to infuse the broth for no longer than 10 minutes before taking the pot off the heat.
Seasonings: Lime juice (no vinegar or lemon juice), fish sauce, and either fresh or dried Thai bird’s eye chillies (crushed or pounded) make for proper Tom Yam seasonings. When it comes to old-fashioned Tom Yam, I usually add one tablespoon of fish sauce per one cup of water at the very beginning of the simmering, so that the fish sauce will flavor the meat as it cooks. The other seasonings are added along with the herbs after the pot has been taken off the heat. That way, the lime juice taste remains fresh and vibrant and the fresh chillies remain aromatic. The amounts of these seasonings are according to your individual taste. One thing I don’t add to Tom Yam is sugar. The broth packs enough natural sweetness that I don’t think it needs any added sweetener. But some people do like it.The use of Thai sweet chilli paste, Nam Prik Pao (น้ำพริกเผา), is optional. Even though I use it here (thinking the bright orange color from the toasted chilli will camouflage the ugliness of the oxtail), I don’t always use it. This is especially true when I make Fish Tom Yam when I think the toasty flavor or Nam Prik Pao kind of takes away from the fresh and delicate flavor of the fish. But this is all up to each individual. Nam Prik Pao has sugar added, so if you choose to use it, you may want to omit sugar.
Vegetables: Mushroom is probably the most common. Some people add fresh tomatoes. I’m a minimalist; I usually add none. If you choose to add mushroom or tomatoes to your old-fashioned Tom Yam, add them about one minute before you take the pot off the heat. They don’t need to be simmered as long as the meat.
Herbs: I only use fresh cilantro. To me, Tom Yam is not Tom Yam without it. I can do without green onions or fresh mint leaves which some people add. Whatever you choose to add, add them at the very end. I usually take the pot off the heat and let it all cool down a little before adding the fresh herbs. That way more of the color and the fresh taste and aroma of the herbs will be retained.