Archive | She Braises RSS feed for this section

Panaeng Curry with Beef (พะแนงเนื้อ)


There appears to be two big camps when it comes to how modern-day panaeng curry is supposed to be: one camp prefers their panaeng saucier and more herbal1; one camp goes for a thicker, meatier, and sweeter panaeng with the taste of peanuts more prominent. These two seem to form the opposing ends of a spectrum on which the kinds of panaeng you’d find on the streets of, or at shophouse eateries in, Bangkok fall. This, of course, is entirely based on my own very unscientific observation.

I have always preferred the former since I grew up eating it both at home and at school,2 but I have in recent years come to embrace the richer, more Rendang-like panaeng which seems to be well liked among patrons of Thai restaurants in the US.

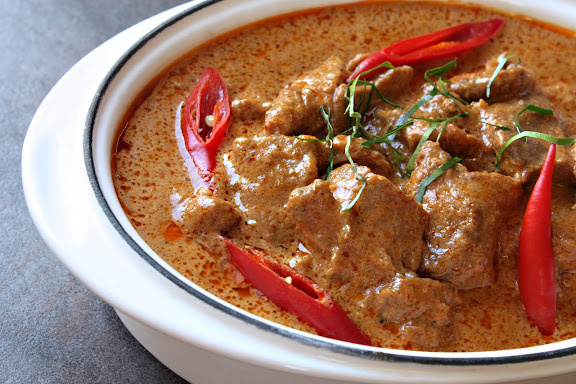
If you like the first type of panaeng, please check out my post on panaeng curry with pork and kabocha squash. However, if you like your panaeng more unctuous and nuttier, I believe this beef panaeng curry recipe would better suit your taste. No recipes will give you exactly what you get from your favorite restaurant, but this one should serve you well as a guide. You can always season it with fish sauce and palm sugar to taste; you can also adjust the consistency of the sauce to your liking.

Regardless of which version you prefer, having fresh kaffir lime leaves on hand is essential in creating good panaeng curry. Dried kaffir lime leaves just won’t do.

Panaeng Curry with Beef (พะแนงเนื้อ)
(Serves 8)

3 lbs beef, cut into 1.5-inch cubes (Use the kind of cut you’d use for a pot roast, i.e. rich in collagen, somewhat fatty, and tough. Lean beef will only ruin the dish.)
1 13.5-ounce can of Chaokoh coconut milk
¼ to ½ cup (or 2 to 4 ounces) of Panaeng curry paste depending on your heat tolerance (I use Maesri, but any imported brand will do.)
3 tablespoons of natural, unsweetened peanut butter (I’ve found regular peanut butter to create an off taste and smell, even the ones that say “all natural.” The best type to use is the type with one ingredient listed: peanuts. You can also grind up some plain roasted peanuts.)
6-7 fresh kaffir lime leaves, cut into very thin strips
1-2 Thai long chilies (jalapeño or Serrano will do), cut on a diagonal lengthwise (optional)
Fish sauce
Palm sugar

* In a saucepan, set over medium-high heat, heat up the coconut “head” (the thick part that rises to the top of the can) along with the curry paste, stirring constantly.
* When the mixture starts bubbling up around the edges and the coconut cream starts to separate, stop stirring and let it boil gently.
* Turn the heat up a little and add the beef.
* Stir to make sure the beef is all coated with the curry sauce.
Add half of the coconut “tail” (the remaining thin, watery part) and just enough water to cover the beef.
Add about 1/4 cup of fish sauce and 1 tablespoon of chopped palm sugar to the pot and bring the whole thing to a boil.
Immediately turn the heat down and let the curry simmer gently, covered, for 45-60 minutes. Check on it occasionally to make sure there’s no scorching on the bottom of the pot and that the beef is fully submerged in liquid (you may need to replenish the liquid with more water, bring the pot back to a boil and turn down the heat again to resume a gentle simmer).
After 45 minutes, check to see if the beef is tender enough. If not, simmer a bit more. If so, give it a stir, remove the lid, and let the braising liquid reduce down to desired consistency.
Once that is achieved, stir in the peanut butter, half of the julienned kaffir lime leaves, and the red peppers. Correct the seasoning with more fish sauce and palm sugar as necessary; take the pot off the heat.
Serve the curry, sprinkled with the remaining kaffir lime leaf strips, with steamed jasmine rice.

1 With Thai basil added to it in addition to the essential fresh kaffir lime leaves.

2 About once every two weeks or so, a mild and saucy panaeng curry with pork and sliced long beans showed up on the school’s lunch menu — one of my favorites.

3 You can also grind up some unsalted roasted peanuts, measure out 3 tablespoons, and use that in lieu of the natural peanut butter. They’re essentially the same thing, though.

Comments are closed

Beef Tongue Stew Recipe

beef tongue stew
While the food blogosphere is all about beautiful holiday cookies this time of year, I’m giving you beef tongue. It’s really not about me being a holiday grouch (though I am); it’s just that this beef tongue stew is one of those things that remind me of home. I know it sounds odd, but this was one of my favorite things to eat growing up. So I thought I would add this to a list of my “homesick menu” after Mom’s Pork Chops with Crispy Garlic and Lemongrass and my aunt’s Soy-Braised Chicken Wings with Quail Eggs.

beef tongue stew
Put a hunk of beef tongue next to a dainty raspberry French macaron and the tongue would probably weep in self-pity. Beef tongue is not a cute food. I realize I’m stating the obvious here.

But I think the thought of preparing it is what scares a lot of people more than its appearance or the idea of eating it. After all, what’s not to like about beef tongue. It’s meaty. It’s beefy. It’s got great texture. Besides, all the great things that have been said about the bonelessness of bananas also apply to beef tongues.

People have different ways of preparing a beef tongue to use in a recipe. My favorite way is to drop the whole piece into a large pot, cover it up with water, add a couple of tablespoons of salt, and simmer away for 2-3 hours, replenishing the water and restoring the simmer occasionally along the way. At that point, the tough skin can be peeled off by hand easily, the tongue proper (you know, the part that flaps) is nice and tender, and the meaty part attached to the base of the tongue is only about 15 minutes of simmering away from being pot-roast tender.


After the tough skin has been peeled off, I always separate the tongue from its base. I like the texture of the tongue at this stage; for me it only needs to be heated through. If the tongue is cooked further along with the base (which still requires a bit more tenderizing at this point), the texture becomes mealy and unpleasant to me. This is also the reason I don’t ever cook the tongue in a slow or pressure cooker. But your mileage may vary.


Last time I asked Mom how she made her beef tongue stew, she wrote back, “One large tongue (prepared and cut into 1-inch thick slices), enough tomato juice to cover, American stew vegetables, fish sauce, dark soy, and lots of pepper. Oh, don’t forget butter.” (Butter was her secret ingredient.) I never had a chance to ask her to clarify it, and now I no longer have Mom around to ask for more information. I guess you and I are stuck with what I think she meant. It has worked for me so far. As you can see, this is no traditional western-style stew. Mom served it with rice. There would be, of course, a bowl of nam pla prik on the table for everybody.

My Mom’s Beef Tongue Stew Recipe
(Serves 6)
Printable Version


One 3-lb beef tongue, prepared as described above
1 quart tomato juice
3 large cloves garlic, peeled and minced
1 teaspoon ground white or black pepper
1 teaspoon sugar (I’ve found this to help balance out the acidity of the tomato juice)
4-5 medium low-starch, waxy potatoes, peeled, cut into wedges, and steamed
3-4 medium carrots, peeled, cut into chunks, steamed
3/4 cup frozen peas, quickly blanched
1/2 lb frozen pearl onions, quickly blanched
2 tablespoons butter
2 tablespoons fish sauce
Light soy sauce, to taste
2 tablespoons cornstarch mixed with 1/3 cup water

Place the tongue base pieces to a large pot. Cover them up with the tomato juice. Add the fish sauce, minced garlic, sugar, and pepper.

Bring the mixture to a boil; reduce the heat to a low simmer. Let the tongue stew, covered, for 15-20 minutes.

Add the butter to the pot along with the remainder of the tongue (i.e. the tongue proper) and the cooked vegetables; heat the whole thing through.

To serve, transfer the tongue pieces and the vegetables to a serving platter; keep them covered.

Thicken the sauce with the cornstarch mixture; adjust the consistency with water as needed.< Check seasoning. Add light soy sauce to taste. Pour the sauce over the tongue and vegetables on the serving plate.

Comments are closed

Soy-Braised Chicken Wings with Quail Eggs (ปีกไก่ต้มเค็มกับไข่นกกระทา)

soy braised chicken
Since we’re in the midst of the holiday season, I thought I would continue with the “homesick menu,” inaugurated by my mother’s Pork Chops with Crispy Garlic and Lemongrass, with this simple dish which my aunt used to make all the time. This dish is based on the various Chinese five-spice soy-braised dishes (phalo พะโล้). Most notable among such dishes is the version with hard-boiled eggs and pork belly (khai phalo ไข่พะโล้) which has been adopted into the Thai cuisine at large and fondly included in the home cooking repertoire of many Thais.

This version is not exactly a Pa-Lo as it does not contain five-spice powder or any individual spices therein; instead it features quite prominently the flavor and fragrance of the quintessential Thai marinade paste of garlic, white peppercorns, and cilantro roots. Also, while the Thai use soy sauce as the main source of salinity according to the Chinese tradition along with fish sauce, they — true to form — have often opted for palm or coconut sugar as the sweetener. This dish is also a bit sweeter than its traditional Chinese prototype.

My aunt’s version employs a lazy streamlined method. Instead of starting off with a caramel base as traditionally done, she just dumps the palm sugar into the braising liquid as the chicken is cooking. We haven’t gotten any complaints as far as I know. If the caramel base is very important to you, I’m afraid this recipe will be a disappointment and suggest that you skip it.


Quail eggs and individual chicken wing joints are used here because of the cute factor more than anything. This aunt of mine has four kids and she is the master of kid-friendly food preparation and presentation. If cuteness means squat to you, chicken thighs, drumsticks, or whole wings would be fine; as do chicken or duck eggs. But if you have a thing for tiny foods, you can miniaturize the dish like I’ve done here.

Lastly, you can prepare your own quail eggs, or you can buy ones that come cooked and peeled in 15-ounce cans (found at most Asian grocery stores). Fresh quail eggs certainly taste far better than canned quail eggs. But if the idea of peeling two dozen hard-boiled quail eggs doesn’t appeal to you, tell yourself — as I do — that martyrdom is overrated and use canned eggs. They’re really not that bad. Whatever eggs you use, be sure to peel them without exposing the yolks for failure to do so means that the finished dish will feature chicken swimming in an unappetizing cloudy, pasty pool of sauce. Not a big deal, but you know

Soy-Braised Chicken Wings with Quail Eggs (ปีกไก่ต้มเค็มกับไข่นกกระทา)
Serves 4-6
Printable Version

2 lbs chicken wing drummettes and middle joints
24 hard-boiled and peeled quail eggs (or two 15-ounce cans of quail eggs)
4 large cloves garlic, peeled
2 teaspoons whole white (or black) peppercorns
200 grams palm sugar
3 tablespoons finely-chopped cilantro roots or stems
1 tablespoon vegetable oil
1/3 cup dark sweet soy sauce (kecap manis)
2 tablespoons of fish sauce
Dark or “white” soy sauce, to taste
(Information on the different soy sauces used here can be found in this post.)
Fresh cilantro for garnish

  • In a mortar, pound the garlic, peppercorns, and cilantro roots together to form a smooth paste. You can also use a small chopper for this task.
  • In a large, heavy-bottomed pot, fry the paste in vegetable oil and 3 tablespoons of plain water over medium-low heat just until the paste becomes lightly toasted.
  • Put the chicken wing joints and the hard-boiled eggs into the pot, followed by just enough to barely cover them.
  • Add the sweet dark soy sauce, fish sauce, and about 1/4 cup of dark soy sauce as a start (you can adjust the saltiness later on; this is just to give the chicken pieces enough flavor as they braise).
  • Add the palm sugar to the pot. I find 200 g of palm sugar to be just right, but you may want add half of it first then adjust later.
  • Bring the whole pot to a boil; reduce to a gentle simmer and let the whole thing braise. Be sure to check for the liquid level occasionally. There should always be enough liquid to barely cover the chicken and the eggs and no more. If the liquid level falls below that point, replenish it with more plain water and restore the simmer.
  • After about 30 minutes, the chicken should be tender and the eggs should have taken on the color of the soy sauces. Taste for seasoning and adjust accordingly.
  • Garnish with fresh cilantro leaves and serve with rice.
Comments { 4 }