Archive | She Uncooks RSS feed for this section

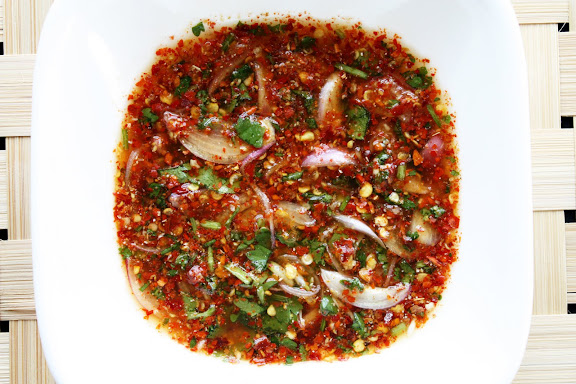
How to Make Jaew แจ่ว – Thai Dried Chilli Dipping Sauce

nam jim jaew
In Thailand, when you buy Gai Yang (grilled spatchcocked chicken) or Mu Ping (Skewered grilled pork), the vendor almost always gives you two kinds of Nam Jim or dipping sauces to take home along with the grilled protein. One, of course, is the indispensable sweet and tangy chilli sauce; the other is one of the many varieties of the smokier, less sweet dipping sauce, Jaew (แจ่ว).

Though not as well known internationally as its sweeter cousin, Jaew is no less a favorite among Thais. This explains why two kinds of dipping sauces accompany every grilled meat purchase — to eliminate the agony which customers would otherwise have to go through in choosing one or the other.

It’s difficult to pin down the definitive Jaew recipe since every family has their own way of making it. One thing, however, remains constant: just as the sweet chilli sauce is always made of fresh red chillies, Jaew is always made with dried red chillies. Traditionally, the chillies are lightly toasted over open flame and pounded into tiny flakes. Fresh galangal, another traditional ingredient, is prepared the same way. Then, true to its northeastern origin, toasted rice powder is also a required ingredient in many family recipes. The herbs and aromatics then go into a mixture of fish sauce, lime juice, and sometimes palm sugar. As you can see, Jaew, for all intents and purposes, is the dressing for Laab (Larb or Lahb) – (ลาบ) even though most people wouldn’t see it that way.

5.0 from 1 reviews
Thai Dried Chilli Dipping Sauce (น้ำจิ้มแจ่ว)
 
Prep time
Cook time
Total time
 
Author:
Recipe type: Condiment, Sauce
Serves: Makes approximately one cup
Ingredients
  • ¼ cup thinly sliced shallots
  • ¼ cup finely chopped cilantro
  • ½ teaspoon galangal powder, optional
  • ⅓ cup fish sauce
  • Juice of one lime
  • 2 teaspoons grated palm sugar (or brown sugar)
  • 1 tablespoon of toasted rice powder (Khao Khua ข้าวคั่ว)
  • 1 tablespoon of dried red pepper flakes (coarsely ground).
Instructions
  1. Mix everything together in a bowl.
  2. Adjust the taste with more fish sauce, lime juice, or sugar, if necessary. The sauce should be predominantly sour and salty.
Comments are closed

How to Peel and Slice a Mango


When an American sees me peel something with a knife — be it a piece of fruit or a potato — he or she invariably makes a comment about the way I hold the knife. Apparently, Americans generally hold their knife with the blade facing the body and, with the thumb guiding the knife, also work their way toward the body as they go. (The only exception to this is when they use a vegetable peeler in which case the peeling is done in quick strokes away from the body.) This is my observation. If you’re an American and you don’t peel this way, I’d say you’re definitely in the minority.

Thais, and perhaps other Asians, hold a knife with the blade facing away from the body and also peel away from the body, guiding the knife with the index finger. I can’t explain this cultural disparity. I am not presenting one way as better than the other either. I’m just reporting it.

That’s how we peel a mango — a ripe one, that is. (We have 2-3 different ways of peeling and slicing a green mango, but that’s irrelevant here.) Peeling a mango with a knife is as common to us as flipping a pancake or a burger patty is to most Americans. It’s done in a simple, straightforward, gadget-free fashion. It’s so instinctive that we don’t even think about it. When I told one of my cousins that I was going to blog about how to peel a mango, she wondered out loud whether I had completely run out of blogging ideas.

During my mother’s last visit to the US, we watched a cooking show together. You should have seen her reaction when the chef demonstrated three ways to cut a mango. The first was done by cutting the fruit — skin and all — into two halves, flipping each half over so the mango half rests on the skin side, scoring the flesh with a knife, and scooping out the scored flesh with a spoon. The second method was done with what the chef thought was the greatest kitchen tool ever — OXO mango splitter. The last method was done by slicing a piece off the base of the mango, standing it on the base, and slicing off the skin (along with half of the edible flesh in the process, unfortunately) the way one would a butternut squash.

My mother looked at the TV screen then at me. Not just her face, but her whole being, turned into a big question mark. No trace of self-righteous incredulity was found on her face; just sheer puzzlement. All that was followed by a monosyllabic utterance that captured it all, “Why?”

You see, I am a self-proclaimed non-dexterous dunce. So I’m the last person to tell you how you should peel a mango. This is just a post on how the Thai people peel a ripe mango, especially when it’s prepared for our traditional dish — mango with coconut sticky rice.

How to Tackle a Ripe Mango the Thai Way

1. Start off by getting a good semi-ripe mango from the store. You shouldn’t buy a mango that is perfectly ripe, but one that is a day or two before it reaches that stage. Perfectly ripe mangoes are very fragile and can easily get bruised in transit. It’s better to let your mango ripen on your kitchen counter than in a huge pile of mangoes at the store where it gets fondled by other shoppers.

2. Wash the mango thoroughly. The dirt and pesticide residue on the skin can be transferred to the exposed flesh through contact with your hands.

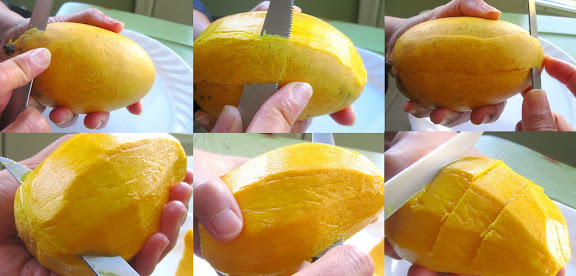
3. With a very sharp knife (or a serrated knife which works very well), make a shallow under-the-skin slice at the top of the mango. With your thumb pushing the blade (away from your body) and your index finger navigating the path, slowly peel a strip of skin off the mango along the curvature of the fruit. Start off with a thin strip as the wider the strip, the more likely you are to slice off too much flesh along with the skin.


4. Once the entire mango is peeled, position your knife parallel with the wide surface of the pit. (A mango is built like a fish with its flesh analogous to the fish meat and the pit analogous to the spine bone. So “fillet” a mango the way you would a fish.) Make a cut as close to the pit as possible. In see-sawing motion, work your knife blade along the length of the pit all the way to the end tip of the mango.

5. Cut the mango crosswise into thick slices. Serve immediately.

Comments are closed

How to Cut and Prepare Papaya


Papaya is one of those fruits that are best eaten when they are very, very ripe. (The only exception, of course, is when you intentionally use papayas when they’re green as the Thai people do when they make the well-known Thai green papaya salad, som tam (ส้มตำ).

I always buy papayas when they’re still a little bit on the green side — the stage in which most papayas are sold in most stores anyway. This allows me to minimize the bruises on the fruit while bringing it home (papayas bruise extremely easily; you even so much as raise your voice with it and it’s bruised all over; that’s why you often see them wrapped in paper or styrofoam nets at the market). Then I leave it on the kitchen counter and let it ripen, undisturbed. This takes about 4-5 days from the purchase date based on the degree of ripeness most of the papayas I’ve purchased usually are. So, buy a papaya 4-5 days before you plan to eat them.

A perfectly ripe papaya takes on a dark shade of orange, becomes wrinkly, appears bruised externally even though it may not be, and sports ugly spots which may look moldy. Sometimes, though, there are actual moldy spots on the skin. This is no big deal, the mold is only skin-deep and requires nothing but peeling, which is what you’re supposed to do anyway. Basically, if your papaya still looks good, it’s probably not ripe enough. It needs to look quite hideous.

I usually buy my papaya from Asian or Latino grocery stores as those are places where you’re more likely to get the kind of papaya that, in my opinion, is the most delicious. The small Hawaiian papayas that are found in mainstream grocery stores aren’t my cup of tea, to say the least. The longer, larger, meatier papayas are the tastiest to me.

The fact that papayas are best eaten when fully ripe presents a bit of a problem because the softer the fruit, the more fragile it is and the more likely it’s going to fall apart on you in the process of preparing it. But fret not as this is easier than you think.

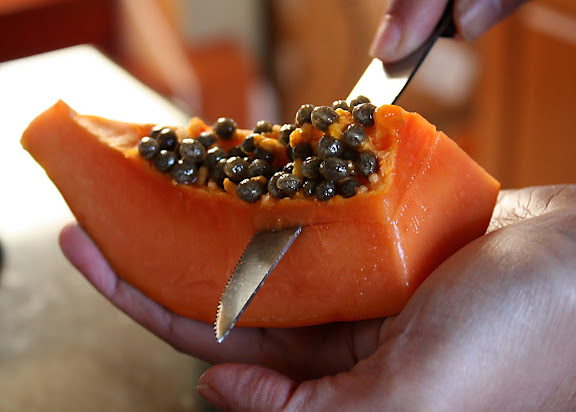
Begin by quartering the papaya: halve it crosswise, then halve each half lengthwise. Depending how big the papaya is, you can cut each quarter lengthwise into 3 or 4 spears. Place on spear, skin side down, on the palm of your non-dominant hand. Hold the sharpest knife in your kitchen (a serrated knife works very well too) in your other hand, positioning the blade horizontally and with the blade pointing away from you, slice off the membrane side, about 2 millimeters deep, in one swift motion (a see-saw motion is easier, if using a serrated knife). The key is to create beautiful, clean, and crisp edges.

Flip the papaya over  and slice off the skin in the same way. If each spear is narrow enough, you may be able to get the skin completely off in one go. But if some of the skin is still left, it’s just a matter of picking up the spare, to use bowling jargon.At this point, your sweet-as-honey, perfectly-ripe papaya flesh is ready to serve.

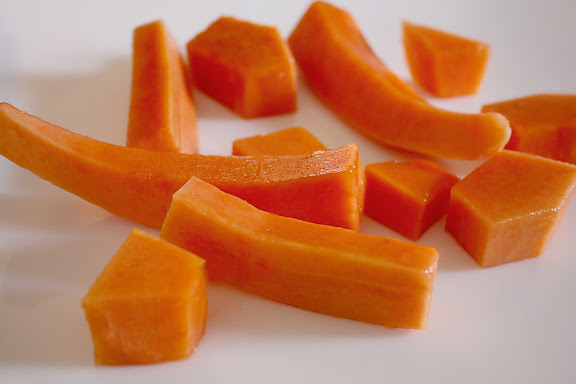
You can serve it in spears or cut each spear crosswise to create bite-sized pieces. If you cut each spear in half lengthwise and then crosswise, you get papaya dice or cubes. The fruit is best served and eaten unadorned, but the Thais like to squeeze a wedge of lime over it. Lime juice brings out the sweetness of the ripe papaya even more.

If desired, you can even use fresh papaya to teach your kids basic geometry as well. Like I said, this fruit is very versatile.

Comments are closed