Beef Tongue Stew Recipe


beef tongue stew
While the food blogosphere is all about beautiful holiday cookies this time of year, I’m giving you beef tongue. It’s really not about me being a holiday grouch (though I am); it’s just that this beef tongue stew is one of those things that remind me of home. I know it sounds odd, but this was one of my favorite things to eat growing up. So I thought I would add this to a list of my “homesick menu” after Mom’s Pork Chops with Crispy Garlic and Lemongrass and my aunt’s Soy-Braised Chicken Wings with Quail Eggs.

beef tongue stew
Put a hunk of beef tongue next to a dainty raspberry French macaron and the tongue would probably weep in self-pity. Beef tongue is not a cute food. I realize I’m stating the obvious here.

But I think the thought of preparing it is what scares a lot of people more than its appearance or the idea of eating it. After all, what’s not to like about beef tongue. It’s meaty. It’s beefy. It’s got great texture. Besides, all the great things that have been said about the bonelessness of bananas also apply to beef tongues.

People have different ways of preparing a beef tongue to use in a recipe. My favorite way is to drop the whole piece into a large pot, cover it up with water, add a couple of tablespoons of salt, and simmer away for 2-3 hours, replenishing the water and restoring the simmer occasionally along the way. At that point, the tough skin can be peeled off by hand easily, the tongue proper (you know, the part that flaps) is nice and tender, and the meaty part attached to the base of the tongue is only about 15 minutes of simmering away from being pot-roast tender.


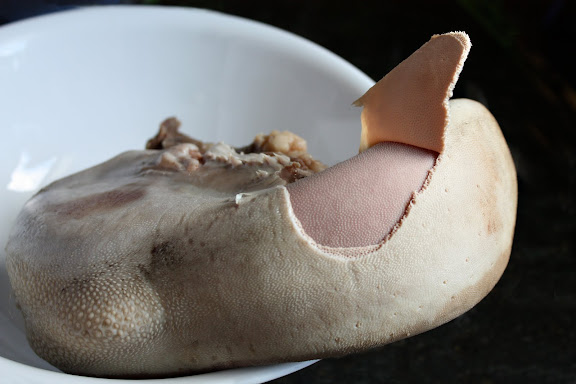
After the tough skin has been peeled off, I always separate the tongue from its base. I like the texture of the tongue at this stage; for me it only needs to be heated through. If the tongue is cooked further along with the base (which still requires a bit more tenderizing at this point), the texture becomes mealy and unpleasant to me. This is also the reason I don’t ever cook the tongue in a slow or pressure cooker. But your mileage may vary.


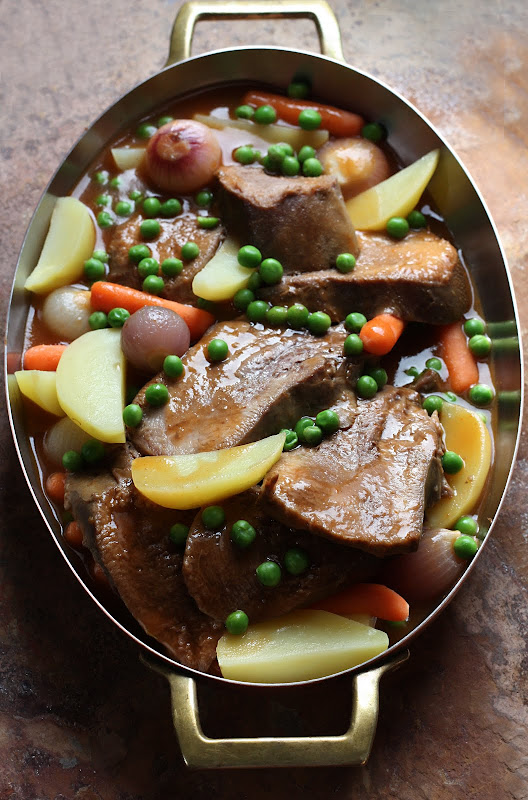
Last time I asked Mom how she made her beef tongue stew, she wrote back, “One large tongue (prepared and cut into 1-inch thick slices), enough tomato juice to cover, American stew vegetables, fish sauce, dark soy, and lots of pepper. Oh, don’t forget butter.” (Butter was her secret ingredient.) I never had a chance to ask her to clarify it, and now I no longer have Mom around to ask for more information. I guess you and I are stuck with what I think she meant. It has worked for me so far. As you can see, this is no traditional western-style stew. Mom served it with rice. There would be, of course, a bowl of nam pla prik on the table for everybody.

My Mom’s Beef Tongue Stew Recipe
(Serves 6)
Printable Version


One 3-lb beef tongue, prepared as described above
1 quart tomato juice
3 large cloves garlic, peeled and minced
1 teaspoon ground white or black pepper
1 teaspoon sugar (I’ve found this to help balance out the acidity of the tomato juice)
4-5 medium low-starch, waxy potatoes, peeled, cut into wedges, and steamed
3-4 medium carrots, peeled, cut into chunks, steamed
3/4 cup frozen peas, quickly blanched
1/2 lb frozen pearl onions, quickly blanched
2 tablespoons butter
2 tablespoons fish sauce
Light soy sauce, to taste
2 tablespoons cornstarch mixed with 1/3 cup water

Place the tongue base pieces to a large pot. Cover them up with the tomato juice. Add the fish sauce, minced garlic, sugar, and pepper.

Bring the mixture to a boil; reduce the heat to a low simmer. Let the tongue stew, covered, for 15-20 minutes.

Add the butter to the pot along with the remainder of the tongue (i.e. the tongue proper) and the cooked vegetables; heat the whole thing through.

To serve, transfer the tongue pieces and the vegetables to a serving platter; keep them covered.

Thicken the sauce with the cornstarch mixture; adjust the consistency with water as needed.< Check seasoning. Add light soy sauce to taste. Pour the sauce over the tongue and vegetables on the serving plate.

Comments are closed

Naem: Soured Pork


khao pad nam
Have you tried naem (แหนม),* a distinguished member of Southeast Asian** class of preserved meats? This soured, fermented sausage is made by curing chopped fresh pork (sometimes with strips of cleaned and boiled pork skin added) at room temperature for a few days until it develops the sour, savory flavor. Naem is traditionally served uncooked as an appetizer, in a salad, or as an ingredient in a dish (in which case it’s served cooked).

Ask the purists, though, and they’ll say naem is supposed to be served raw — always. They believe that only in the raw state can naem truly fulfill its raison d’être. Serving it cooked, they insist, is heretical.

Plastic-wrapped naem is found in the refrigerated section of most Southeast Asian grocery stores.

That’s probably true. But here’s my confession: I hate raw naem. There. Whew!

On the other hand, I love shredded naem in my Khai Jiaw (Thai-style omelet). I love naem in a coconut milk-based relish, naem lon (แหนมหลน) or lon naem (หลนแหนม). Most of all, I love naem fried rice. If this was the only kind of fried rice I’m allowed to eat for the rest of my life, I’d be okay with that.

Naem is packed with bold flavors; it’s salty, sour, and garlicky. Small pieces of naem that are interspersed throughout your fried rice act as both the protein source and one of the main flavoring agents. Hold back on the fish sauce or soy sauce when you make naem fried rice; you may not need as much of it as you think you do.

Chopped-up naem scrambled with some eggs makes for such a delicious rice topper.

Other than that, treat naem the same way you would any fresh meat which you normally use in your fried rice.

If you have never had naem, I’d encourage you to try store-bought naem first just to acquaint yourself with its taste and texture. If you decide you like it and want to learn how to make it, come back here early next year to find out how to make naem 2-3 different ways. This post is just a tease, you see.

*Also known as Nem chua in Vietnamese and som mu (ສົ້ມໝູ), literally “sour pork,” in Lao.
**Particularly the eastern part of the Indochinese Peninsula.

Comments are closed

Soy-Braised Chicken Wings with Quail Eggs (ปีกไก่ต้มเค็มกับไข่นกกระทา)


soy braised chicken
Since we’re in the midst of the holiday season, I thought I would continue with the “homesick menu,” inaugurated by my mother’s Pork Chops with Crispy Garlic and Lemongrass, with this simple dish which my aunt used to make all the time. This dish is based on the various Chinese five-spice soy-braised dishes (phalo พะโล้). Most notable among such dishes is the version with hard-boiled eggs and pork belly (khai phalo ไข่พะโล้) which has been adopted into the Thai cuisine at large and fondly included in the home cooking repertoire of many Thais.

This version is not exactly a Pa-Lo as it does not contain five-spice powder or any individual spices therein; instead it features quite prominently the flavor and fragrance of the quintessential Thai marinade paste of garlic, white peppercorns, and cilantro roots. Also, while the Thai use soy sauce as the main source of salinity according to the Chinese tradition along with fish sauce, they — true to form — have often opted for palm or coconut sugar as the sweetener. This dish is also a bit sweeter than its traditional Chinese prototype.

My aunt’s version employs a lazy streamlined method. Instead of starting off with a caramel base as traditionally done, she just dumps the palm sugar into the braising liquid as the chicken is cooking. We haven’t gotten any complaints as far as I know. If the caramel base is very important to you, I’m afraid this recipe will be a disappointment and suggest that you skip it.


Quail eggs and individual chicken wing joints are used here because of the cute factor more than anything. This aunt of mine has four kids and she is the master of kid-friendly food preparation and presentation. If cuteness means squat to you, chicken thighs, drumsticks, or whole wings would be fine; as do chicken or duck eggs. But if you have a thing for tiny foods, you can miniaturize the dish like I’ve done here.

Lastly, you can prepare your own quail eggs, or you can buy ones that come cooked and peeled in 15-ounce cans (found at most Asian grocery stores). Fresh quail eggs certainly taste far better than canned quail eggs. But if the idea of peeling two dozen hard-boiled quail eggs doesn’t appeal to you, tell yourself — as I do — that martyrdom is overrated and use canned eggs. They’re really not that bad. Whatever eggs you use, be sure to peel them without exposing the yolks for failure to do so means that the finished dish will feature chicken swimming in an unappetizing cloudy, pasty pool of sauce. Not a big deal, but you know

Soy-Braised Chicken Wings with Quail Eggs (ปีกไก่ต้มเค็มกับไข่นกกระทา)
Serves 4-6
Printable Version

2 lbs chicken wing drummettes and middle joints
24 hard-boiled and peeled quail eggs (or two 15-ounce cans of quail eggs)
4 large cloves garlic, peeled
2 teaspoons whole white (or black) peppercorns
200 grams palm sugar
3 tablespoons finely-chopped cilantro roots or stems
1 tablespoon vegetable oil
1/3 cup dark sweet soy sauce (kecap manis)
2 tablespoons of fish sauce
Dark or “white” soy sauce, to taste
(Information on the different soy sauces used here can be found in this post.)
Fresh cilantro for garnish

  • In a mortar, pound the garlic, peppercorns, and cilantro roots together to form a smooth paste. You can also use a small chopper for this task.
  • In a large, heavy-bottomed pot, fry the paste in vegetable oil and 3 tablespoons of plain water over medium-low heat just until the paste becomes lightly toasted.
  • Put the chicken wing joints and the hard-boiled eggs into the pot, followed by just enough to barely cover them.
  • Add the sweet dark soy sauce, fish sauce, and about 1/4 cup of dark soy sauce as a start (you can adjust the saltiness later on; this is just to give the chicken pieces enough flavor as they braise).
  • Add the palm sugar to the pot. I find 200 g of palm sugar to be just right, but you may want add half of it first then adjust later.
  • Bring the whole pot to a boil; reduce to a gentle simmer and let the whole thing braise. Be sure to check for the liquid level occasionally. There should always be enough liquid to barely cover the chicken and the eggs and no more. If the liquid level falls below that point, replenish it with more plain water and restore the simmer.
  • After about 30 minutes, the chicken should be tender and the eggs should have taken on the color of the soy sauces. Taste for seasoning and adjust accordingly.
  • Garnish with fresh cilantro leaves and serve with rice.
Comments { 4 }