


Carving is such a big part of the Thai culture. When it comes to things involving intricate details, Thai craftsmen are second to none in the world; those who have been to the Grand Palace and the Temple of the Emerald Buddha in Bangkok can testify to that.
The love of carving has also spilled into the realm of food. A lot of Thai people seem to like carving fruits and vegetables. Not me, though. I don’t mind it; I even carve some. But I’m not good at it; I doubt I’ll ever be. That works out fine, because I’m completely okay with the idea of me leaving this earth without having mastered the art of fruit and vegetable carving.
That said, I have nothing but respect for those who are into and good at carving fruits and vegetables. It’s an art, and it takes the kind of craftsmanship, patience, focus, and dexterity that many people, including me, don’t have.
But is food carving purely artistic? Can it be both artistic and practical?
I think so, and the scoring of squid comes to mind. Just as making deep slashes on the flesh of a fish makes it cook faster, creating some nicks and grooves on the otherwise smooth and slippery surface of squid enables the sauce to adhere to the squid better. This is similar to the grooves on rigatoni or cavatappi which serve the same purpose.
Here’s the thing: you don’t have to stop there; you can turn this into art as well in which case you can even call it, well, carving.
But let’s begin with the basic.

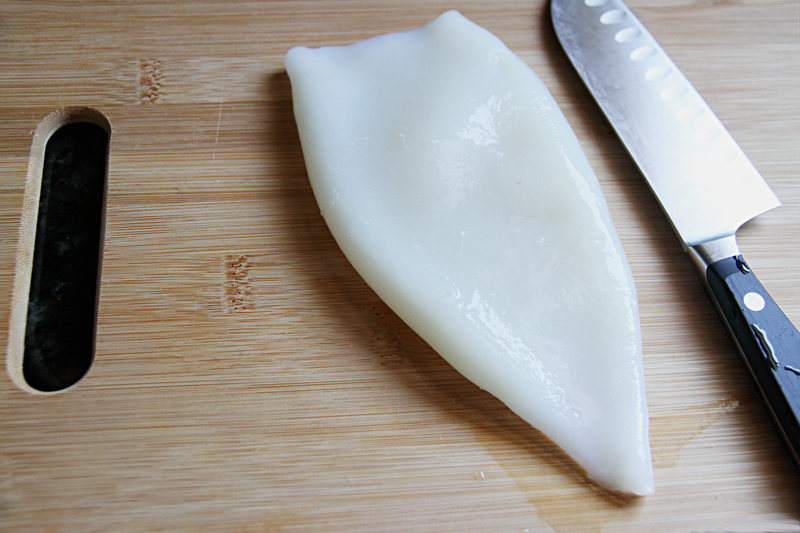
Here’s how to score squid. Take a skinned and gutted squid like what you see here, insert a knife into the pocket and make a long slit, from the inside, from its opening down to the pointy bottom. Then you open it up like a book. (If you’re new to this, go for a larger type of squid with thick flesh as it’s easier to handle. Asian and Italian supermarkets tend to have prepared squid in the freezer.)

With the tip of a very sharp knife, create parallel diagonal lines from end to end that’s about 1/2 or 3/4 of the way deep into the squid flesh. Be careful not to cut it all the way through. Also, make sure the cuts are on the inside of the squid, because squid curls from inside out.

Then you create a crisscross pattern by making parallel diagonal lines in the opposite direction.

Then you cut the squid into bite-sized pieces. Taking into account the curling and shrinking that occur when the squid is heated, a bite-sized piece should measure about 2 inches by 2 inches (if your mouth is big, adjust accordingly). The squid is now ready to be used in a recipe.

Now that you have mastered the basic, you can play around with the design. If you make the cuts on a 40° angle both ways, the tip of each square will stick out and curl up a bit, resulting in what I call the “ginger flower” (or “pine cone”) look which is quite nice. If you make the cuts on a 20° angle, you get an even more pronounced ginger flower look.
In the photo above:
1. At the bottom left is squid scored the basic way (straight cuts with the blade of the knife making a 90° angle with the surface of the squid). The cuts are spaced about 1/4 of an inch apart both ways.
2. At the top left is squid scored on a slant with the blade of the knife making a 20° angle both ways and with the cuts spaced 1/4 inch apart.
3. At the bottom right is squid scored on a slant with the blade of the knife making a 20° angle both ways. The cuts are spaced 1/4 inch apart one way and 1/2 inch apart the other way.
4. At the top right is squid scored on a slant with the blade of the knife making a 40° angle one way and 90° angle the other way. The cuts are spaced 1/2 inch apart both ways.
In other words, there are no rules. Search your soul to see what kind of squid it yearns for and go after it. Be creative. Go nuts. Have fun. The squid is your oyster.
____________________
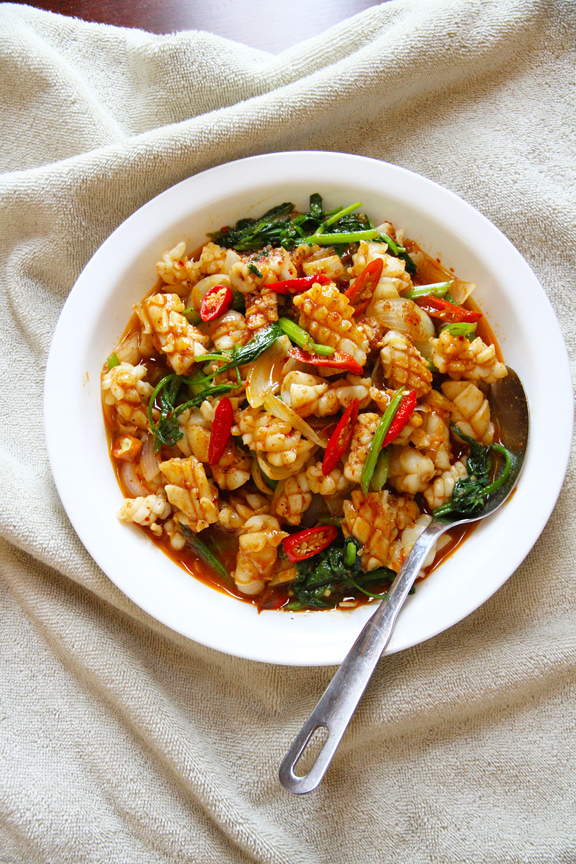
The photo at the very top shows stir-fried squid with chile jam which is a variation of Stir-fried Chicken with Chile Jam on page 43 of Simple Thai Food. Replace the chicken with the same amount of squid which has been prepared as described above. But instead of adding the squid directly to the wok as you would chicken, be sure to blanch the squid just until it has curled up first (this should take about 10 seconds in simmering water). Shake off the excess water and add the blanched squid to the stir-fry at the same time the recipe tells you to add the chicken. The cooking time in the wok will be much less in this case, because the squid only needs to be heated through at this point.
The blanching ensures that the squid doesn’t release excess moisture into the sauce thereby diluting it. You want the sauce to be concentrated enough to cling to all the grooves you’ve just spent time creating on the surface of the squid. This way, each bite packs more flavor.
I throw in a handful of Chinese celery (cut into 1-inch pieces) towards the end. The recipe doesn’t call for this, and you don’t need to do so.
Comments are closed.